Top 10 Upcycling Ideas for Furniture and Home Decor
Upcycling is the art of transforming old or unused items into something new and beautiful. It not only gives furniture a second life but also adds a unique charm to your home decor. In this article, we’ll explore 10 innovative upcycling ideas for furniture that are perfect for breathing life into your living space while staying eco-friendly.
Table of Contents
What is Upcycling Furniture and Home Decor?
Upcycling furniture and home decor refers to the process of creatively reusing and transforming old or discarded items into new, functional, or decorative pieces. Instead of throwing away materials, furniture, or decor that are no longer needed or are in poor condition, upcycling gives them a second life by repurposing them into something fresh and unique.
This process can involve a variety of techniques such as painting, refinishing, reupholstering, or adding new elements to the original item. These methods allow the creator to enhance the item’s aesthetic appeal, functionality, or both.
The goal of upcycling is not only to reduce waste but also to promote sustainability in home design. By reimagining what’s no longer useful, upcycling helps minimize the environmental impact of discarded goods, while adding distinctive and personal touches to living spaces.
The 10 Best Upcycling Ideas for Furniture and Home Decor
Upcycling is a creative and sustainable way to refresh your living space. By transforming old or unused items into functional and stylish pieces, you can give new life to your furniture and home decor. Here are 10 innovative upcycling ideas that will help you create unique, eco-friendly designs for your home.
1. Transform Old Dressers into Chic and Functional Bathroom Vanities
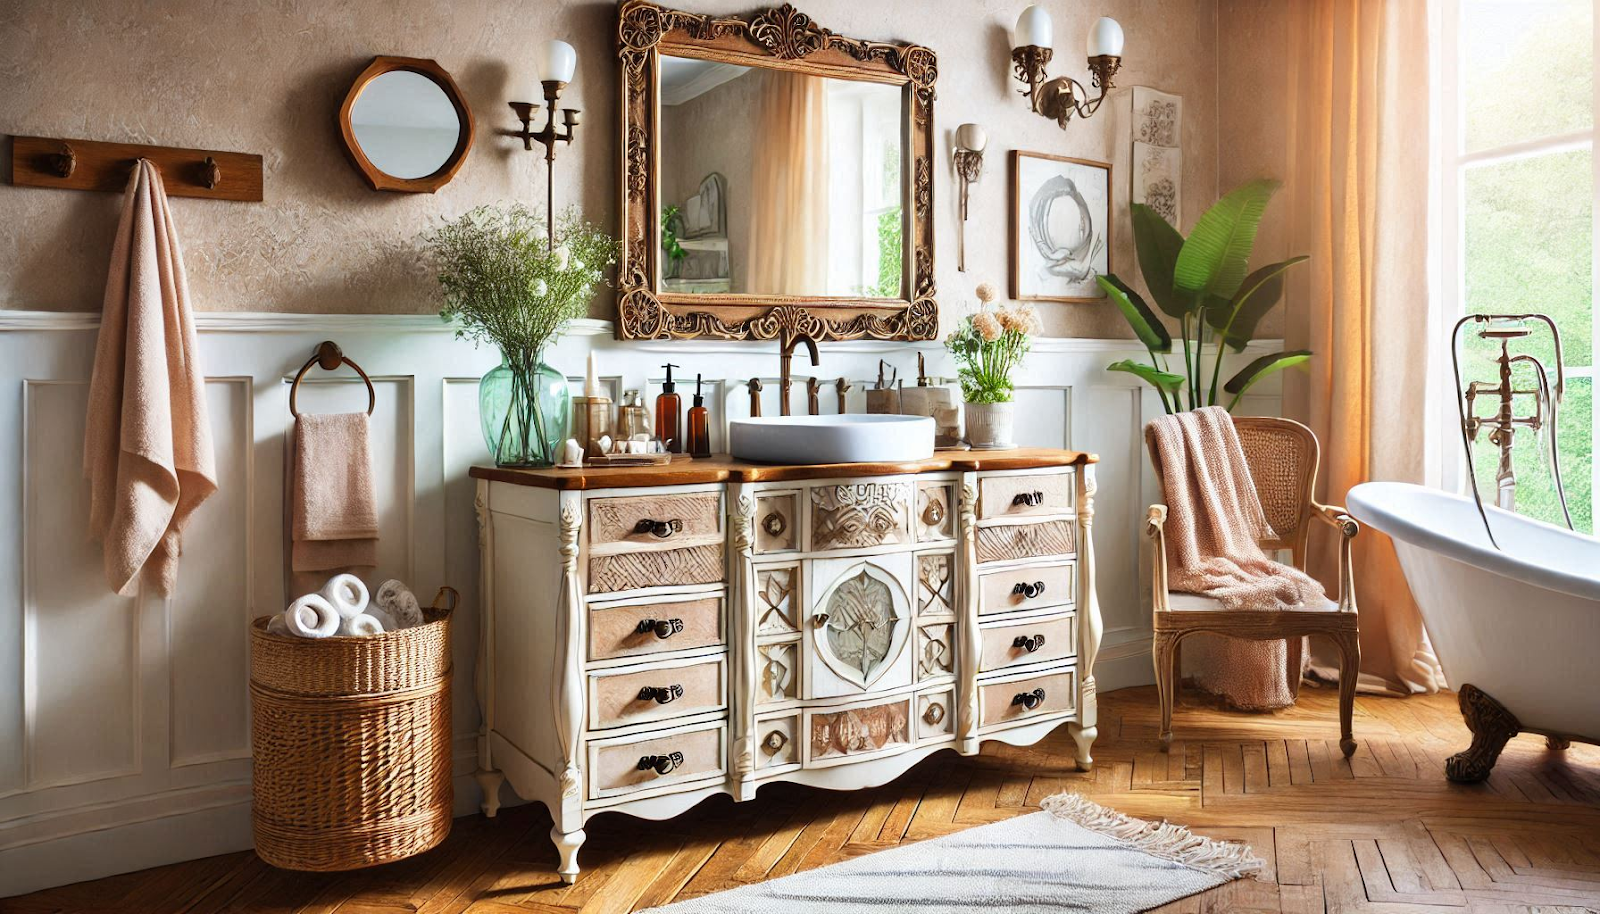
Turning an old dresser into a bathroom vanity is a perfect blend of practicality, style, and creativity. This project not only adds character to your bathroom but also provides a unique storage solution.
Materials and Tools Needed:
- An old dresser (preferably solid wood)
- Sink and faucet with plumbing kit
- Power drill and saw
- Waterproof sealant or varnish
- Paint or stain (based on your desired finish)
- Sandpaper for smoothing surfaces
Step-by-Step Guide:
- Prepare the Dresser: Remove the top drawers and measure to create a hole for the sink. Cut carefully, ensuring the sink fits securely.
- Fit the Plumbing: Check that the dresser has enough space to accommodate the plumbing pipes, ensuring there are no obstructions or structural issues.
- Paint or Stain: Apply a finish that complements your bathroom’s decor. For a modern look, choose bold colors like navy or emerald, while distressed finishes work best for rustic or farmhouse styles.
- Seal the Surface: To protect the wood from water damage, apply a waterproof sealant, particularly around the sink area, ensuring durability and longevity.
Design Tips:
- Opt for bold, contemporary colors such as matte black or teal to add a modern flair.
- For a vintage, rustic touch, consider distressed paint or a natural wood finish with a light wash.
- Add unique hardware such as gold or brass handles to elevate the vanity’s style.
By upcycling an old dresser, you’re not only creating a functional bathroom vanity, but also a piece of furniture with charm and personality.
2. Repurpose Wooden Pallets into Charming Rustic Shelves for Any Room
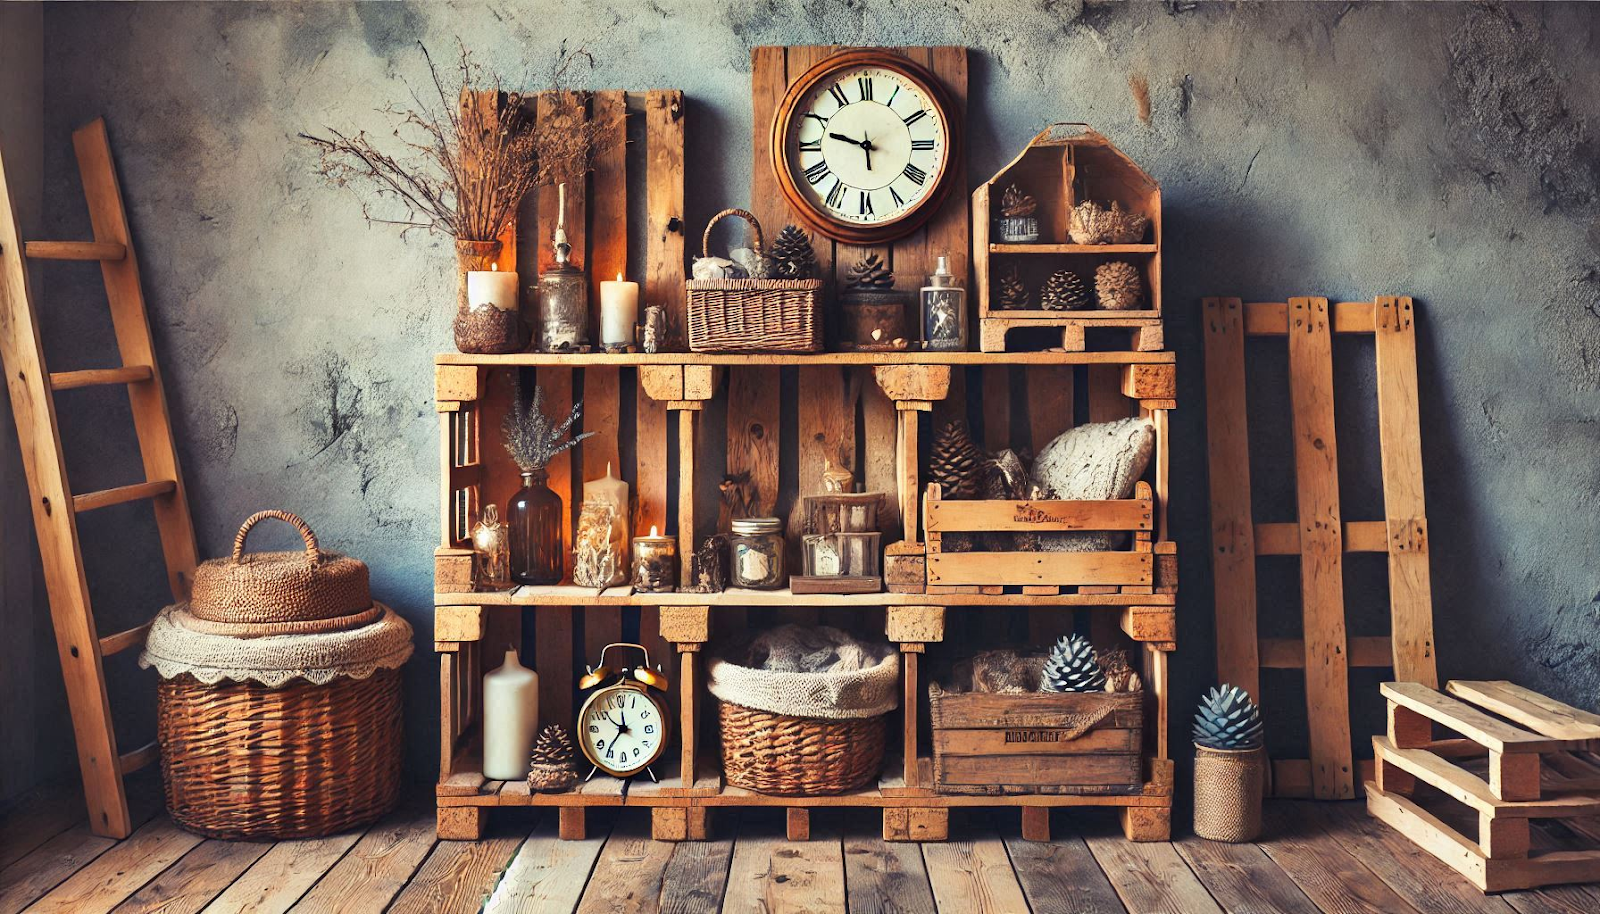
Wooden pallets are incredibly versatile and can be transformed into rustic, functional shelves that add warmth and character to any room. With a little creativity, these simple pallets can be turned into stunning storage pieces or decorative shelves.
Finding and Preparing Pallets:
- Source Clean Pallets: Look for high-quality, clean wooden pallets from local stores, warehouses, or online marketplaces. Make sure they’re in good condition, free of nails or damage.
- Sand Thoroughly: Sand the pallets well to remove splinters and rough edges, ensuring that they are safe for handling and ready for painting or finishing.
Ideas for Pallet-Based Shelving:
- Wall-Mounted Shelves: Attach the pallet directly to the wall with sturdy brackets or screws for a rustic, industrial look. This option is great for showcasing plants, books, or decorative items.
- Floating Shelves: Use smaller sections of the pallet to create minimalist, floating shelves. This design gives the shelves a clean, modern look while still maintaining a rustic charm.
Styling Options:
- Neutral Tones: Paint the pallet shelves in neutral shades like white, gray, or beige for a more subtle, contemporary feel.
- Natural Wood Finish: Leave the wood unfinished or lightly stained to highlight its natural grain and texture, enhancing the rustic vibe.
- Add Functionality and Decor: Incorporate hooks or baskets to maximize storage, or use the shelves to display vintage decor, plants, or even small artwork to create a warm, welcoming atmosphere.
With these ideas, wooden pallets can be upcycled into beautiful and practical shelving units that bring a touch of rustic charm to any space.
3. Turn Vintage Doors into Stunning, Functional Tables with a Creative Twist
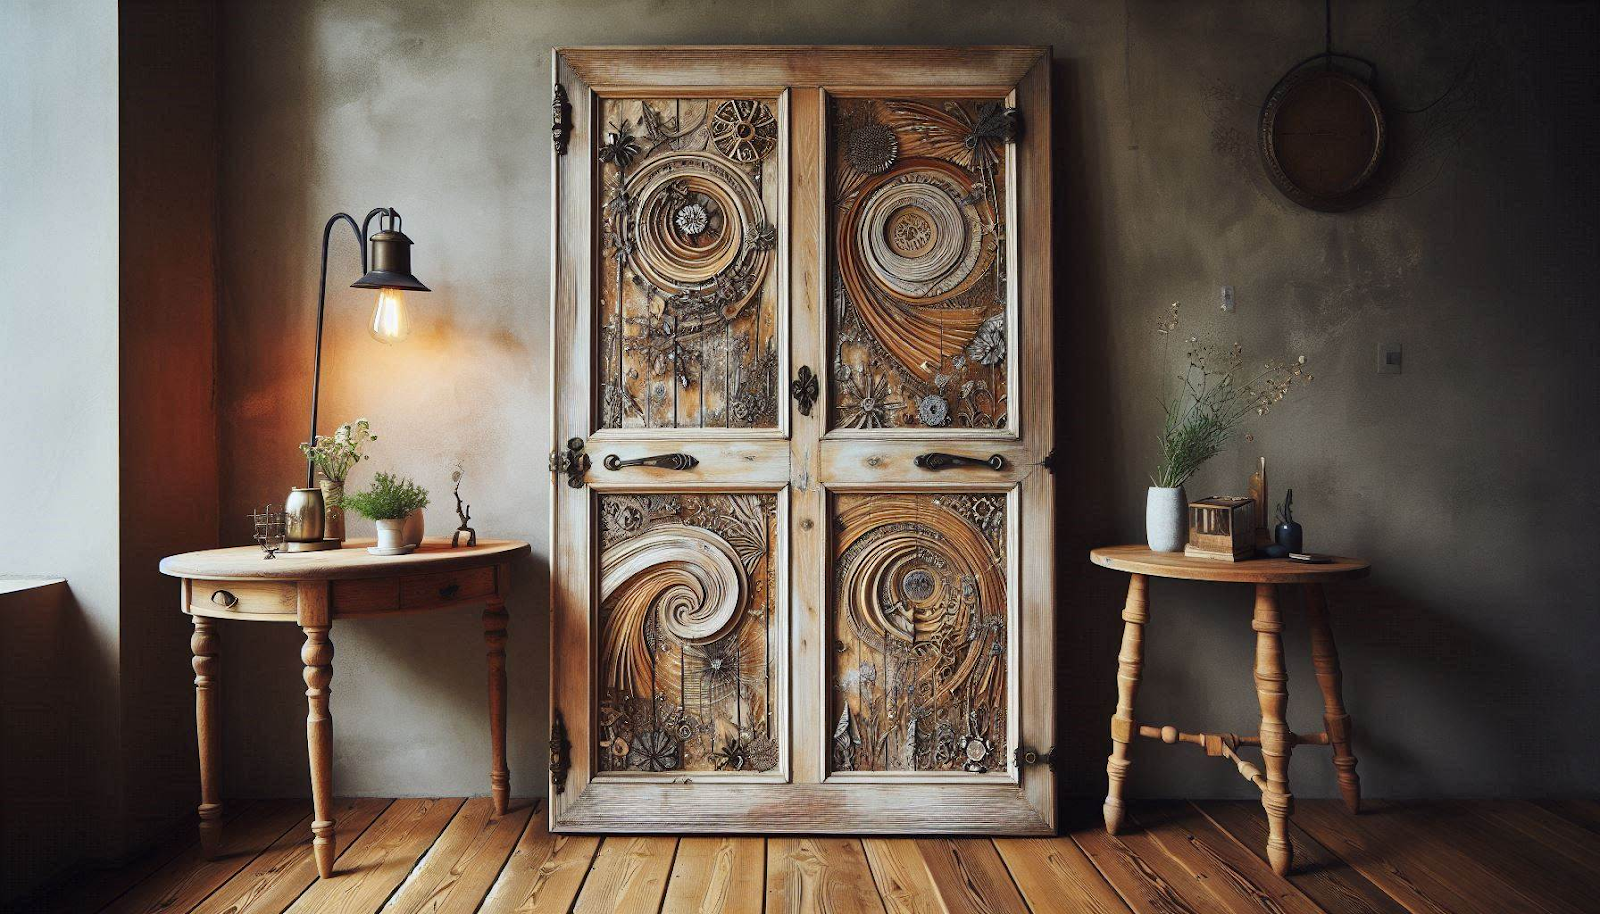
Old, vintage doors can be transformed into beautiful, one-of-a-kind tables that add character and functionality to any room. With a little imagination, these doors can become dining tables, coffee tables, or even side tables, making them a perfect upcycling project.
Steps to Create a Table:
- Choose a Door: Select a door with a flat, solid surface. Consider doors with intricate details, carvings, or vintage charm to create a statement piece. Ensure the door is sturdy enough to support the weight of the table.
- Add Legs or Supports: Attach sturdy legs to the door. Metal legs can give it a modern, industrial feel, while wooden legs provide a more traditional or rustic look. You can even repurpose old furniture legs for a unique touch.
- Finish with Style: Sand the surface of the door to smooth out imperfections, then paint or varnish it for a sleek, polished finish. Choose a color that complements your home decor, from bold hues to classic neutrals.
Creative Tips:
- Incorporate Glass Panels: If the door has old glass panels, consider keeping them as part of the design, creating a stunning glass-top table or adding extra visual interest.
- Add Unique Patterns: For a more personalized look, you can paint or stain the door with bold geometric patterns, stripes, or floral designs. This adds a creative twist and turns the door into a true focal point of the room.
- Reinforce the Structure: If the door is particularly old or fragile, reinforce it with additional supports underneath to ensure it can hold weight and function properly as a table.
Repurposing a vintage door into a table allows you to merge functionality with history, creating a unique furniture piece that tells a story and serves as a standout element in your home.
4. Convert Worn-Out Chairs into Charming Planter Stands for a Unique Garden Touch
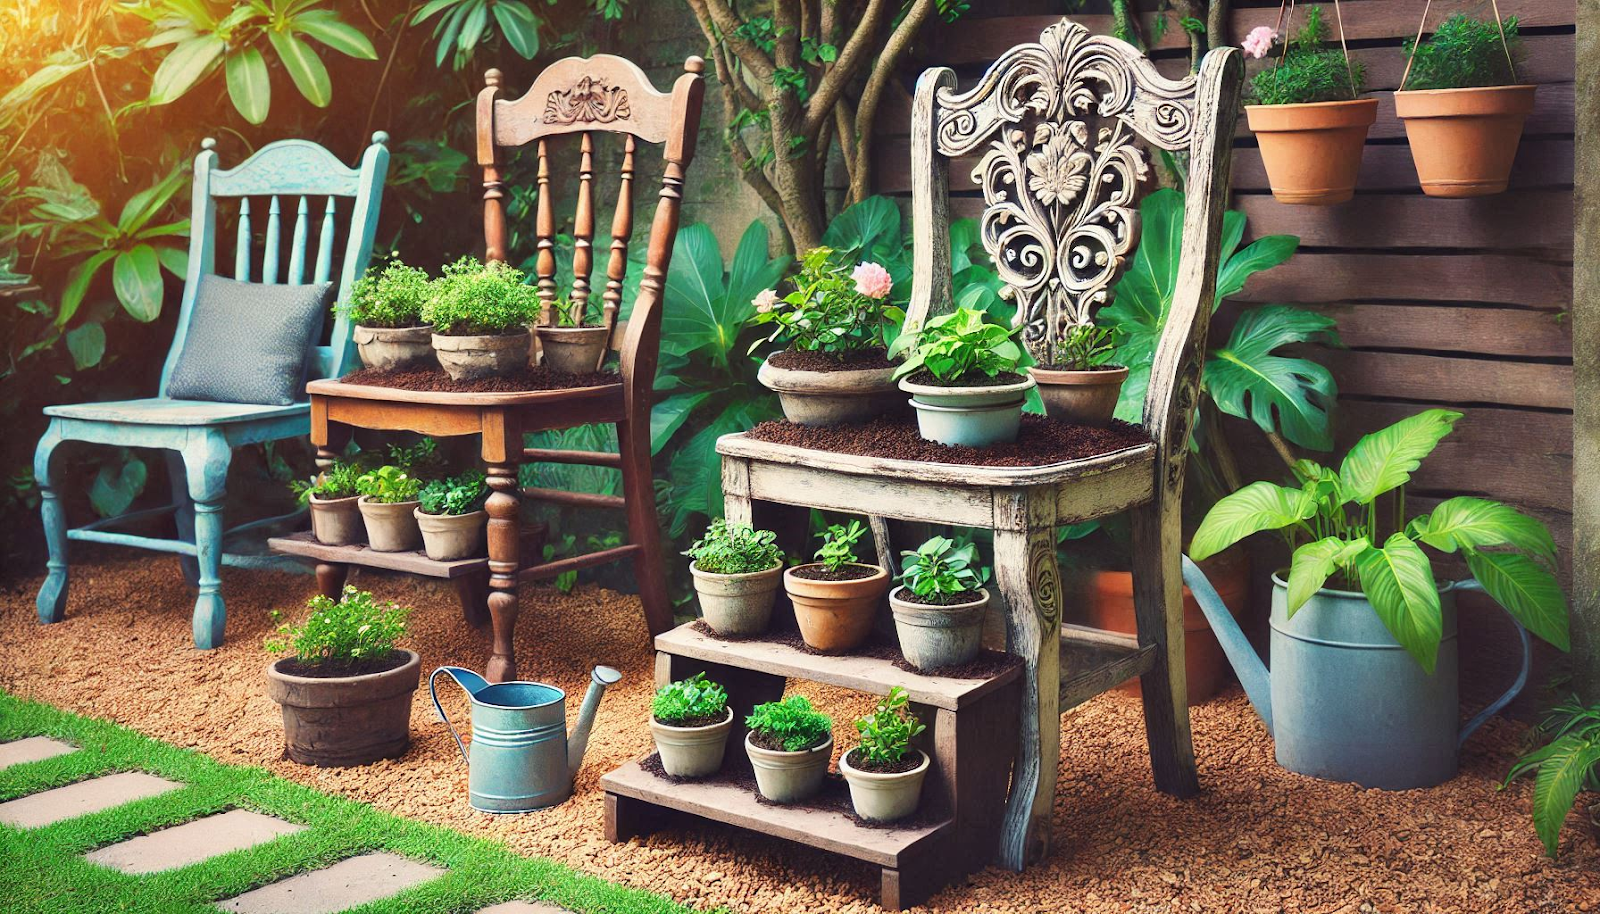
Even broken or worn-out chairs can be upcycled into stylish and functional planter stands that bring a rustic charm to your garden or indoor space. This creative transformation not only saves furniture from being discarded but also adds a whimsical touch to your decor.
Preparing the Chairs:
- Remove Broken Parts or Repair Them: If the chair has broken legs, arms, or a damaged seat, carefully repair or remove the damaged parts. Ensure the chair is structurally sound enough to hold a planter securely.
- Sand and Paint for Outdoor Durability: Sand the chair to smooth out rough surfaces and prepare it for paint. Use a weather-resistant outdoor paint to protect the chair from the elements if it’s going to be placed outside.
Adding Plants:
- Place Pots or Baskets in the Seat Area: Position a plant pot, basket, or a wooden crate in the seat area of the chair. Ensure it fits securely to avoid tipping over.
- Opt for Cascading Plants: To enhance the visual appeal, choose cascading plants like ivy, petunias, or succulents that spill over the edges of the chair, creating a beautiful, natural display.
Creative Styling Ideas:
- Use Multiple Chairs: For a more dramatic effect, stack or arrange several old chairs in a row or circular formation, each holding a different plant.
- Mix Chair Styles: Combine different types of chairs (e.g., armchairs, rocking chairs, or wooden dining chairs) for an eclectic, whimsical garden theme.
- Add Decorative Elements: Incorporate decorative items like fairy lights, small garden statues, or vintage watering cans to further personalize your planter stands.
By repurposing worn-out chairs into planter stands, you not only breathe new life into old furniture but also create a delightful and eco-friendly garden feature that’s sure to impress.
5. Make Stylish Ottomans from Vintage Suitcases for a Chic, Functional Piece
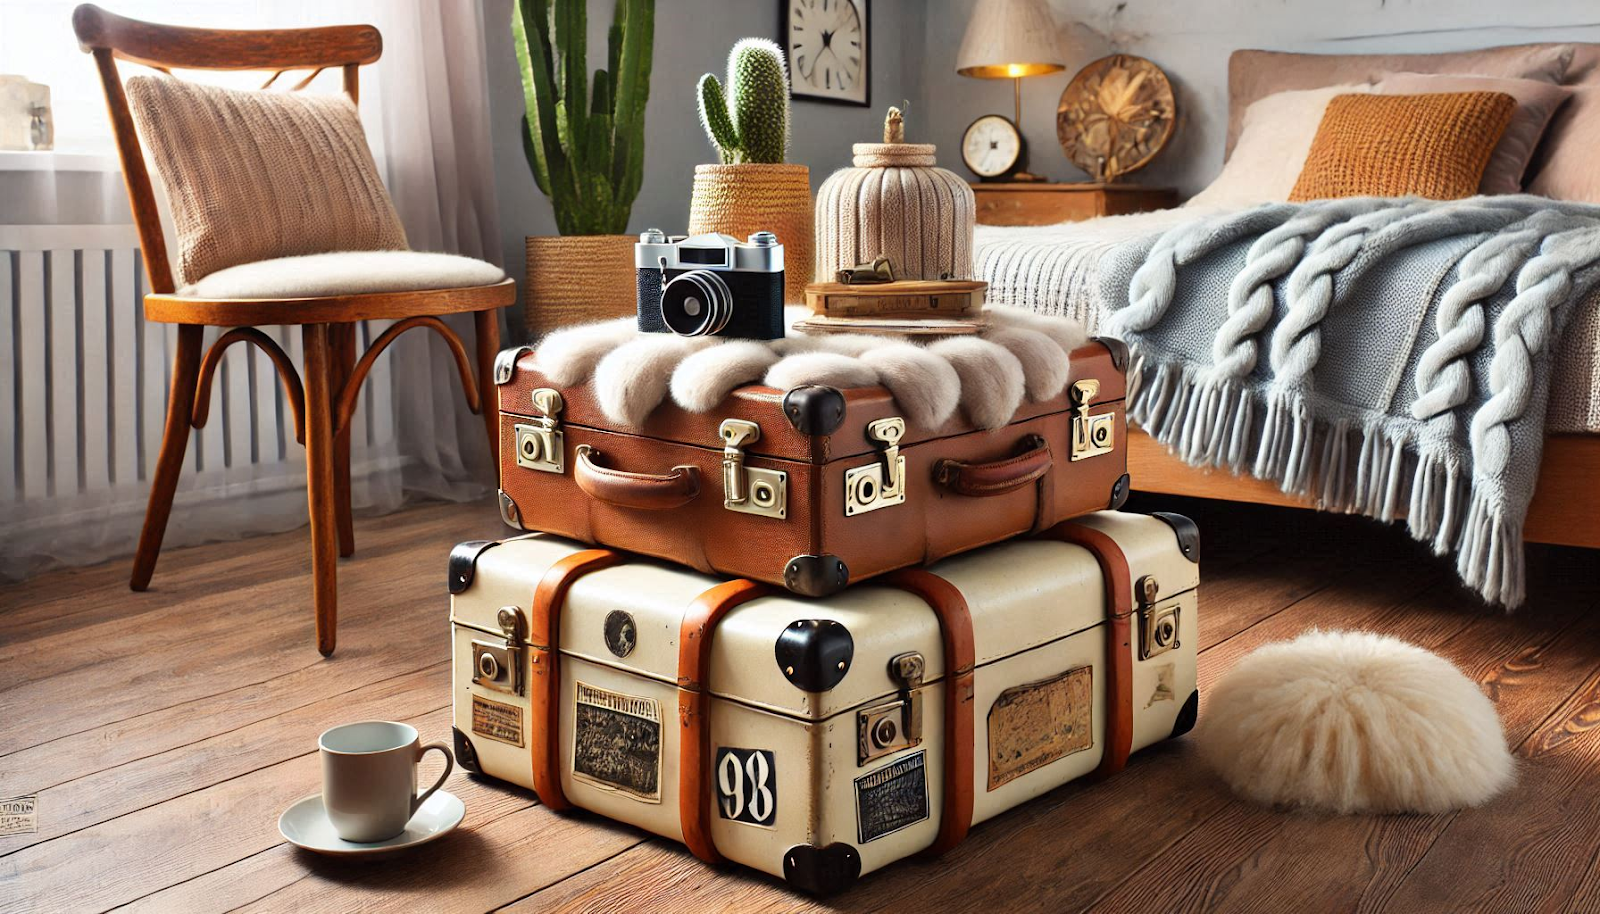
Old, vintage suitcases can be upcycled into chic and functional ottomans that not only add personality to your space but also provide extra storage. This creative project turns a nostalgic piece of luggage into a versatile furniture item perfect for any room.
Step-by-Step Guide:
- Attach Legs: Screw on short, sturdy legs to elevate the suitcase. You can choose from various styles of legs—metal for an industrial look or wooden legs for a more traditional or mid-century vibe. Make sure the legs are firmly attached and level.
- Add Upholstery: Cushion the top of the suitcase to create a comfortable surface. You can use foam padding or batting, then cover it with your fabric of choice. Opt for a fabric that matches your room’s style—velvet for luxury, linen for a casual touch, or leather for a vintage feel.
- Secure the Lid: Make sure the suitcase lid remains functional. Use sturdy hinges to keep it attached and ensure the lid can open and close easily. If you plan to use it for storage, reinforce the hinges for added durability.
Practical Uses:
- Seating: Use the ottoman as a unique seating option for your living room, bedroom, or hallway. It adds a vintage charm while providing a cozy spot for guests to sit.
- Coffee Table: For a more functional use, place the ottoman in front of your sofa as a coffee table. Its hard surface can hold drinks, books, or decorative items, while the storage compartment inside is perfect for hiding remotes, magazines, or blankets.
Creative Styling Ideas:
- Match the Suitcase to Your Room’s Theme: Choose suitcases in colors and patterns that complement your room’s decor. For example, a floral vintage suitcase can add charm to a shabby-chic room, while a sleek, black suitcase would fit perfectly in a modern, minimalist setting.
- Personalize with Decorative Details: Add metal studs, a leather strap, or a painted design to the suitcase to give it a more personalized, one-of-a-kind look.
By transforming a vintage suitcase into an ottoman, you’re not only upcycling a forgotten item but also creating a stylish, functional piece of furniture with plenty of character and hidden storage.
6. Create Stunning Headboards from Antique Windows for a Vintage Touch
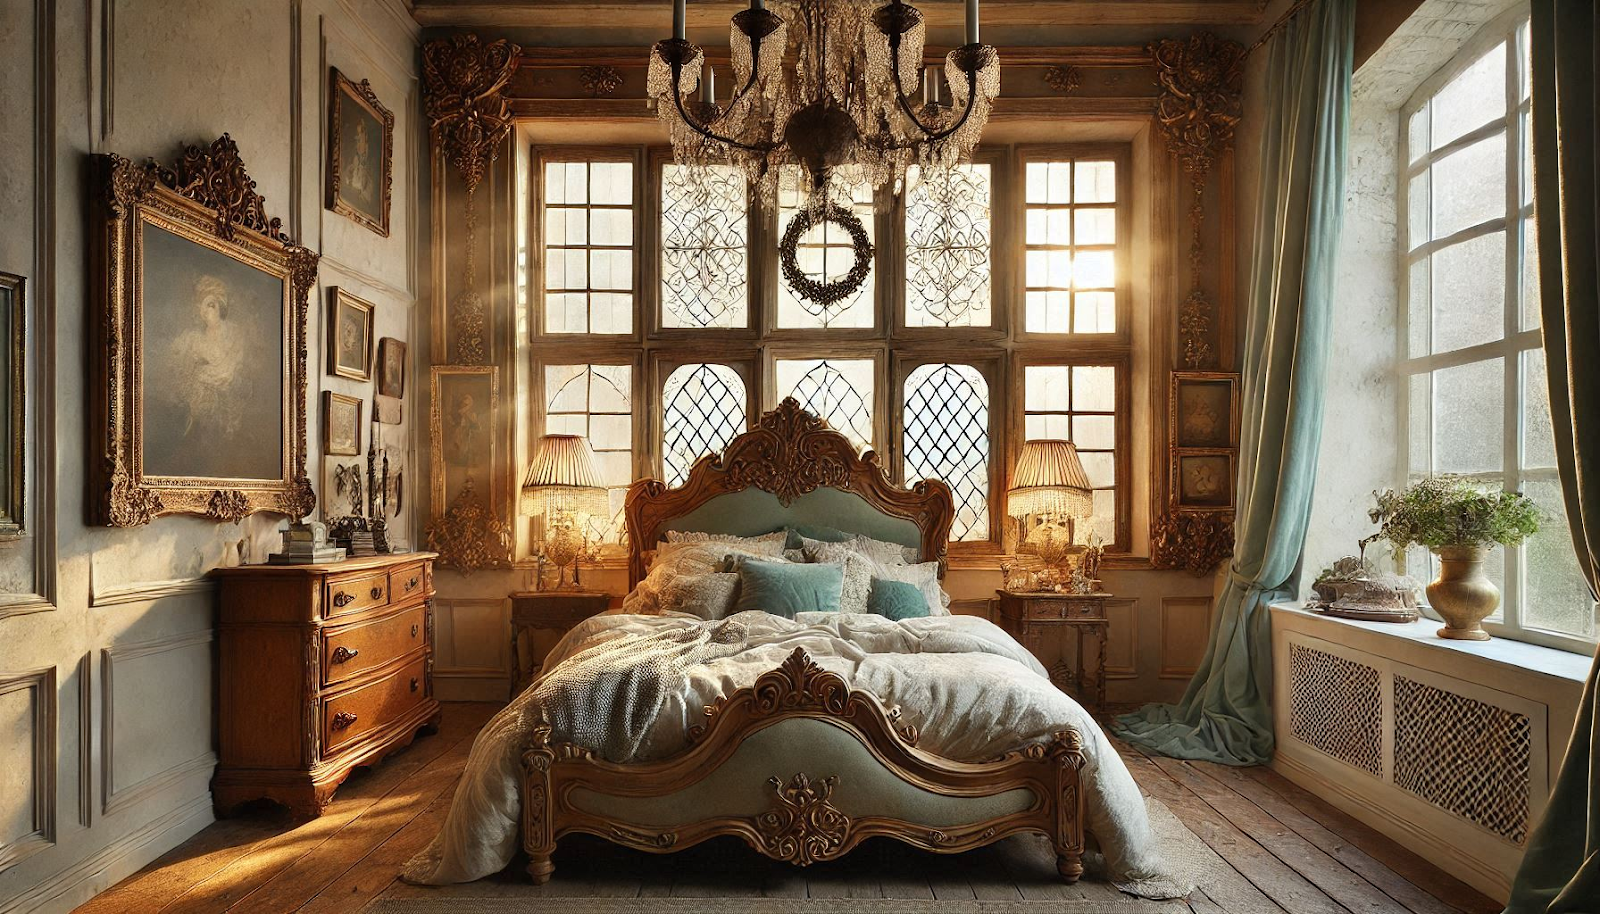
Antique windows, with their rustic charm and intricate details, make perfect headboards for any bed. This upcycling project combines history with functionality, turning an old window into a beautiful, unique focal point for your bedroom.
How to Secure Antique Windows:
- Clean and Reinforce the Windows: Start by cleaning the window thoroughly, removing any dirt, dust, or old paint. Check for any loose or fragile parts. Reinforce the window by adding extra support to the frame if necessary to ensure it’s sturdy enough for use as a headboard.
- Attach to the Wall or Bed Frame: Depending on the size and weight of the window, you can attach it to the wall or the bed frame. Use heavy-duty brackets or screws to secure the window to the wall. If attaching it to the bed frame, ensure it’s securely fastened to avoid any wobbling.
Decorative Touches:
- Add Fairy Lights: String fairy lights around the window frame or along the edges to create a soft, ambient glow. This adds warmth and charm, perfect for creating a cozy, inviting atmosphere.
- Paint or Stain the Window: Enhance the antique look by painting or staining the window. For a vintage aesthetic, choose pastel shades, neutral tones, or distressed finishes that highlight the window’s character. Alternatively, leave it in its natural state for a more rustic feel.
- Incorporate Fabric or Wreaths: Attach fabric to the window for a soft, elegant look, or add a wreath or garland across the top to bring in a seasonal or personalized touch.
Creative Ideas for Customizing Your Window Headboard:
- Multi-Pane Windows: If the window has multiple panes, consider placing decorative glass or mirrors in each section to create visual interest and reflect light in the room.
- Shuttered Headboard: Use antique shutters as part of the design for a full, framed headboard. This adds even more vintage flair and texture.
By repurposing antique windows into a headboard, you’re not only bringing history into your space but also creating a personalized and unique design element that adds both charm and character to your bedroom.
7. Craft Unique Wine Racks from Reclaimed Wood for a Stylish, Eco-Friendly Touch
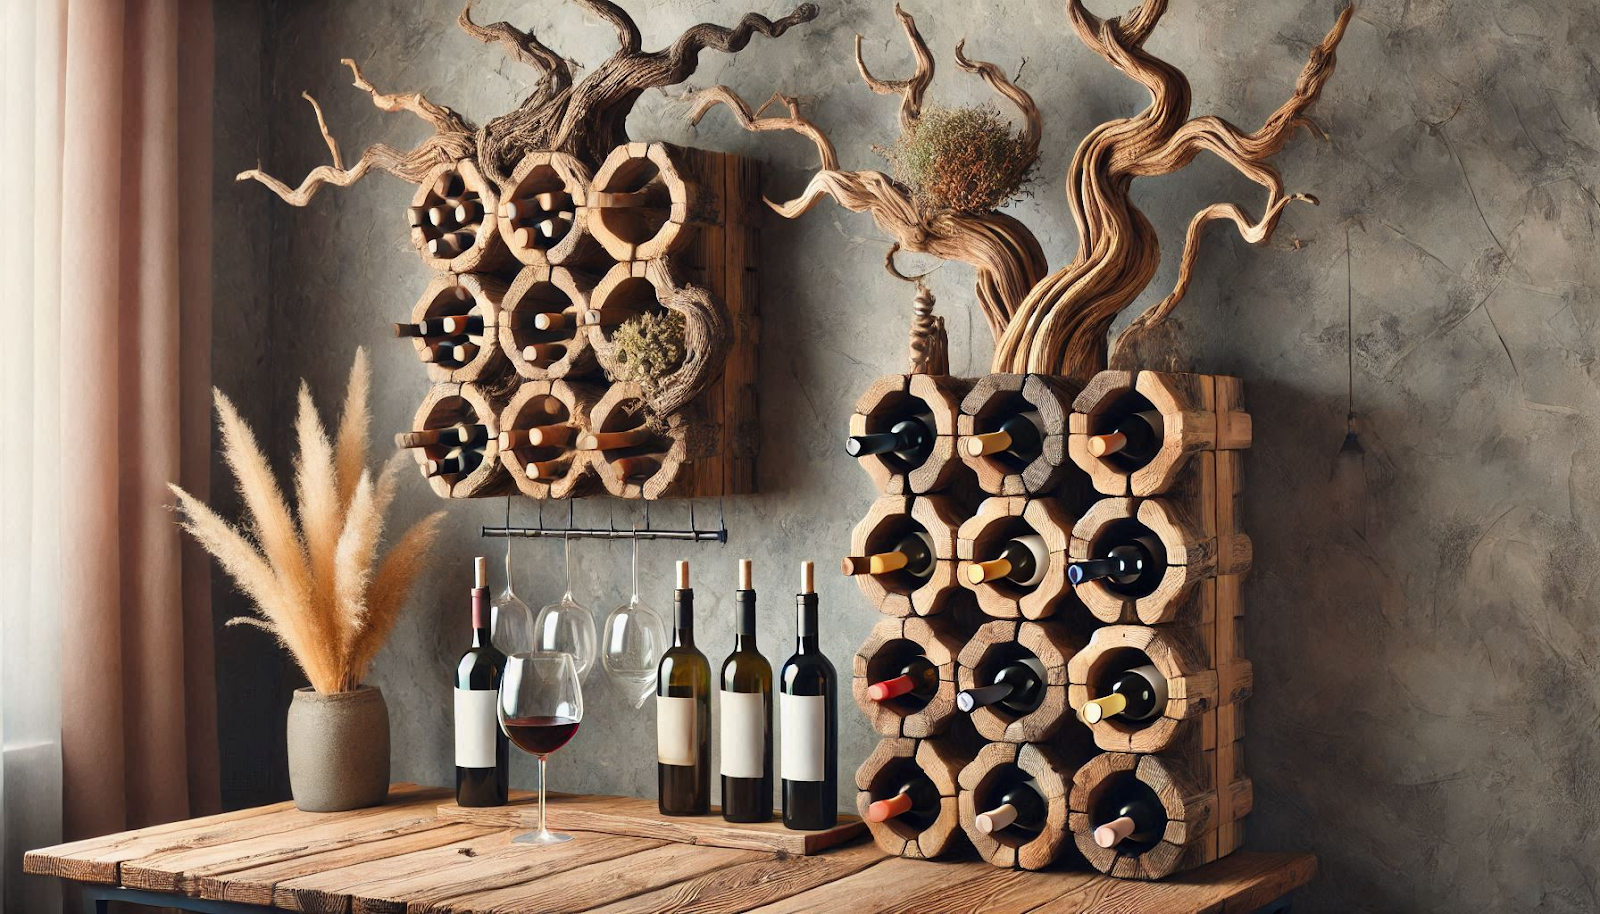
Reclaimed wood offers a beautiful, eco-conscious way to craft custom wine racks that combine rustic charm with practical functionality. Whether you’re storing wine in a kitchen, dining room, or wine cellar, this upcycling project creates a stylish storage solution with a personal touch.
Sourcing and Preparing Wood:
- Look for Old Furniture or Barn Wood: Search for reclaimed wood from old furniture pieces, pallets, or barns. Barn wood is especially popular due to its weathered look, which adds character and a vintage feel to your wine rack.
- Sand and Treat the Wood for Longevity: Once you’ve sourced the wood, sand it thoroughly to remove rough patches or old finishes. After sanding, treat the wood with a protective finish such as wood oil or varnish to enhance its natural beauty and protect it from moisture or wear over time.
Design Customization:
- Add Bottle Holders: Design your wine rack with individual bottle holders, either by carving out circular notches or using small wooden dowels. These will securely hold each wine bottle in place, while also adding to the visual appeal.
- Incorporate Wall Mounts for Compact Design: To save space, consider wall-mounted wine racks. Use metal or wooden brackets to hang the wine rack on the wall. This is a great option for smaller spaces or for creating a minimalist design.
- Mix and Match Styles: Combine different types of wood for a varied texture and aesthetic. For example, pair dark walnut wood with light pine to create a striking contrast, or add reclaimed barn wood for a rustic, farmhouse style.
Creative Styling Tips:
- Use Wine Glass Holders: Incorporate small, mounted racks or hooks beneath the wine bottle holders to hang wine glasses. This makes your wine rack both functional and visually pleasing.
- Incorporate Shelves for Extras: Add small shelves above or below the rack to store wine accessories like corkscrews, decanters, or decorative items.
By turning reclaimed wood into a custom wine rack, you’re not only creating a unique and practical piece of furniture but also contributing to sustainability. This project allows you to add a personal, eco-friendly touch to your home while showcasing your wine collection in style.
8. Revamp Plain Coffee Tables with Stunning Mosaic Tile Designs for an Artistic Touch
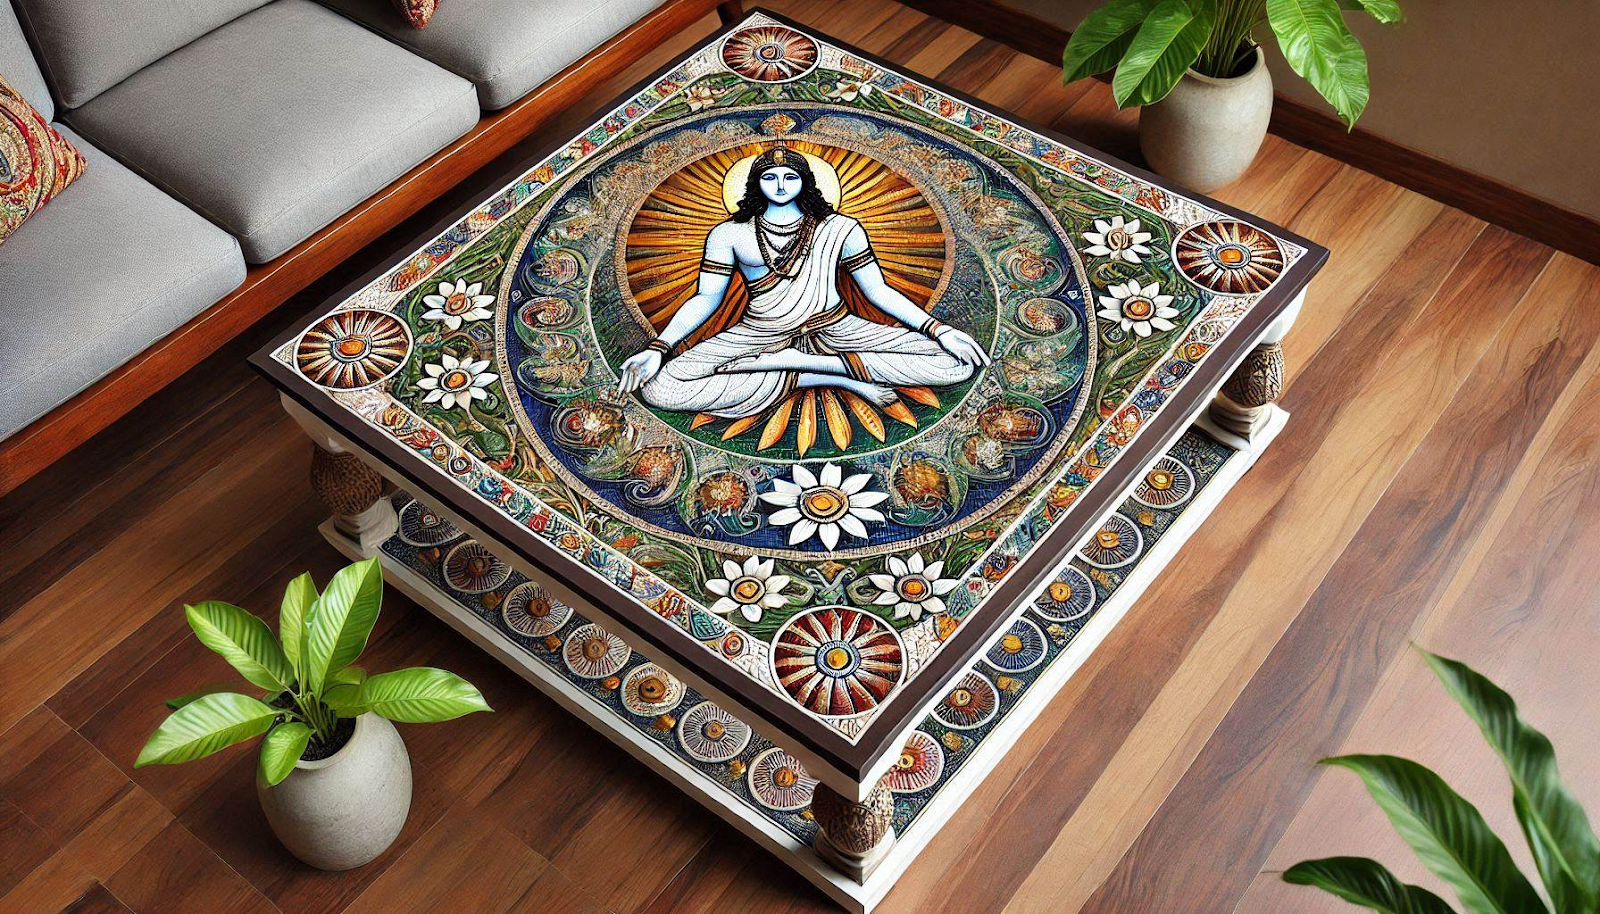
Transforming a basic coffee table into a vibrant, eye-catching piece is easy with mosaic tile designs. This creative upcycling project not only updates the look of your table but also adds texture and color, making it a unique centerpiece in your living room.
Steps to Add a Mosaic Design:
- Prepare the Surface: Start by cleaning the coffee table thoroughly to remove any dust, dirt, or previous finishes. Sand the surface to smooth out any imperfections and provide a better surface for the tiles to adhere to.
- Choose Tiles: Pick a variety of colorful or patterned tiles to create a dynamic mosaic design. You can choose glass tiles for a shiny finish, ceramic tiles for a more rustic look, or even repurpose broken china or old tiles for a more eclectic feel. Be sure to select tiles that match your desired aesthetic, whether it’s bold, subtle, geometric, or floral.
- Adhere Tiles: Arrange your tiles in the desired pattern on the table’s surface, starting from the center or the edges. Once you’re satisfied with the design, use a strong adhesive to fix the tiles into place. Allow the adhesive to set before moving on to the next step.
- Grout the Tiles: Once the tiles are securely glued, fill in the gaps between them with grout. Use a rubber spatula to spread the grout evenly, ensuring all the spaces between the tiles are filled. Wipe away excess grout with a damp cloth and let the grout dry completely.
Creative Styling Ideas:
- Designs and Patterns: Create geometric patterns, floral motifs, or abstract designs depending on your style. Use contrasting colors or shades of the same hue for a sophisticated look.
- Personal Touches: Incorporate meaningful or nostalgic elements, like broken pottery or ceramic pieces from old dishes, to create a more personalized design.
- Finish with a Protective Coating: Once the grout is dry, seal the table with a clear, protective topcoat to prevent damage from spills and wear while preserving the vibrancy of the mosaic tiles.
Revamping a coffee table with a mosaic tile design is an affordable way to add artistic flair to your living space while giving new life to an old table. This upcycling project can be tailored to suit any decor style, from modern and sleek to rustic and eclectic.
9. Use Old Crates for Stylish and Practical Storage Solutions
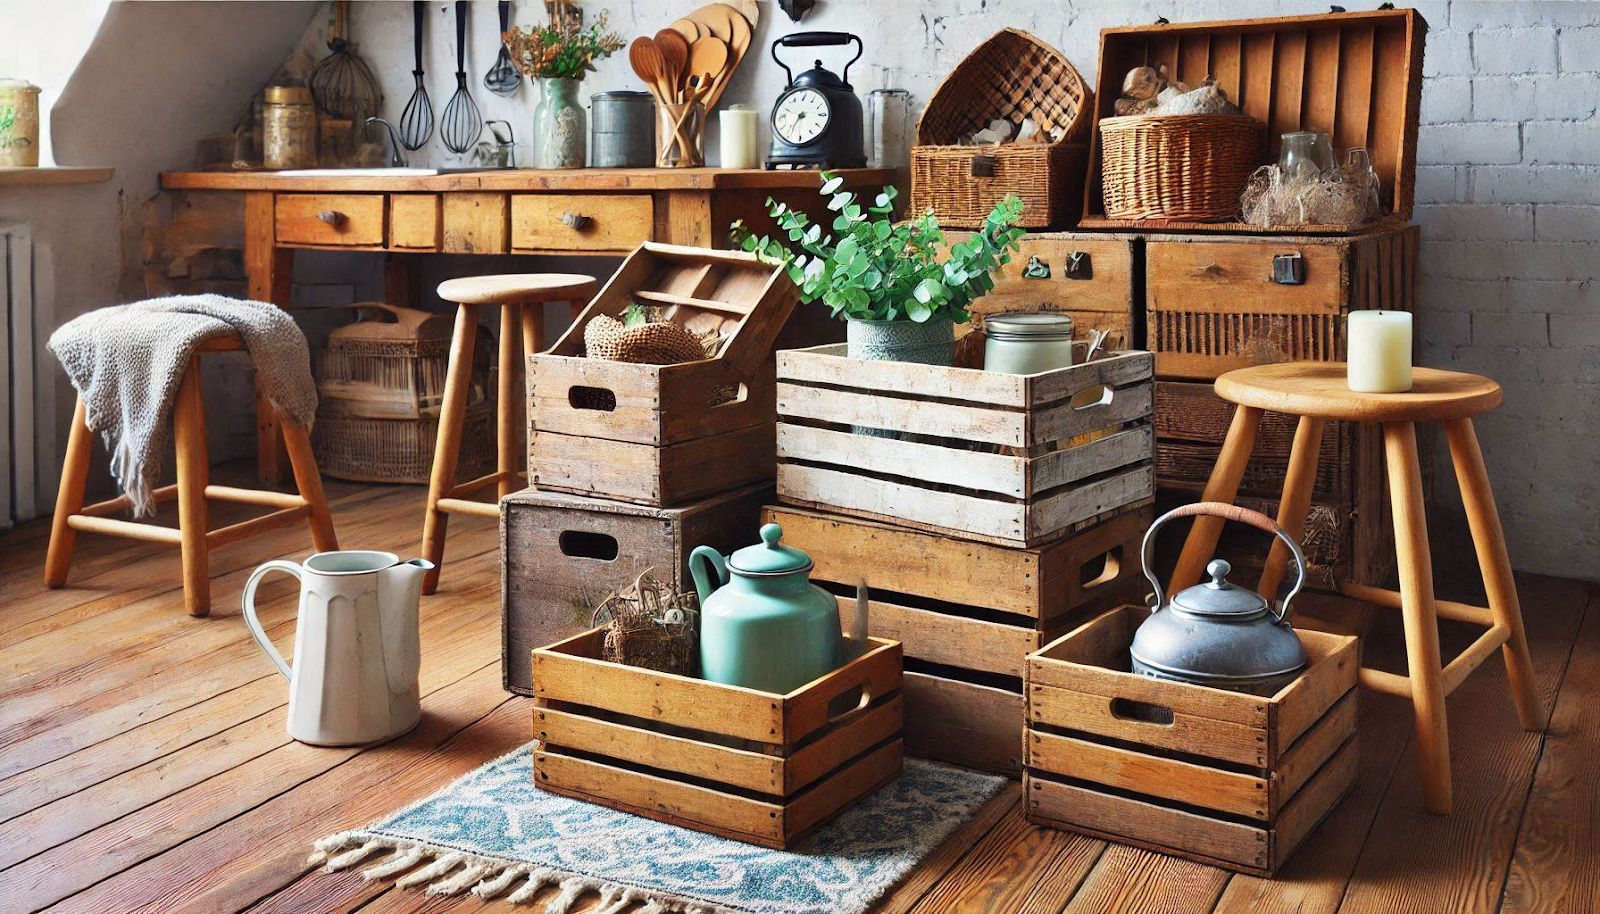
Old crates are incredibly versatile and can be upcycled into practical storage units that add character and organization to any room. Whether you’re looking for a way to store books, toys, or household items, crates can be easily transformed into functional and stylish storage solutions.
Preparation and Stacking:
- Clean and Paint the Crates: Begin by cleaning the crates thoroughly to remove dirt and debris. Sand any rough edges to smooth the surface. Then, paint or stain the crates to match your home decor. Choose neutral colors for a minimalist look, or go bold with bright colors for a playful, eclectic style.
- Stack Them in Creative Ways: Stack the crates vertically to form shelving units, or place them horizontally for a more laid-back look. You can create a modular shelving system, use them as cubbies for organized storage, or even stack them to create a unique coffee table or side table. The possibilities are endless.
Styling Tips:
- Add Wheels for Mobility: For easy portability, attach small wheels to the bottom of each crate. This is especially useful for larger storage solutions, allowing you to move the crates around as needed, whether they’re used in the living room, garage, or bedroom.
- Use Labels for Organization: Label each crate for easy identification, especially if you’re storing smaller items like craft supplies, office materials, or kitchen essentials. Use chalkboard paint on the front of the crates for a customizable, reusable label, or affix decorative tags for a more polished look.
Creative Uses for Upcycled Crates:
- Bookshelves: Stack crates on their sides and line them up against the wall for an instant, rustic bookshelf. Mix and match different crate sizes for a more dynamic display.
- Storage Bench: Use stacked crates with a cushioned top to create a stylish, functional bench with built-in storage.
- Toy Organizer: Stack several crates in the kids’ room to create a toy storage unit. The open design makes it easy for children to access their favorite toys.
Upcycling old crates into storage solutions allows you to create both practical and stylish furniture pieces that can be customized to suit any room or organizational need. With a little creativity, you can transform humble crates into a chic, functional part of your home decor.
10. Upcycle Old Tires into Stylish Ottomans or Tables for a Unique, Eco-Friendly Look
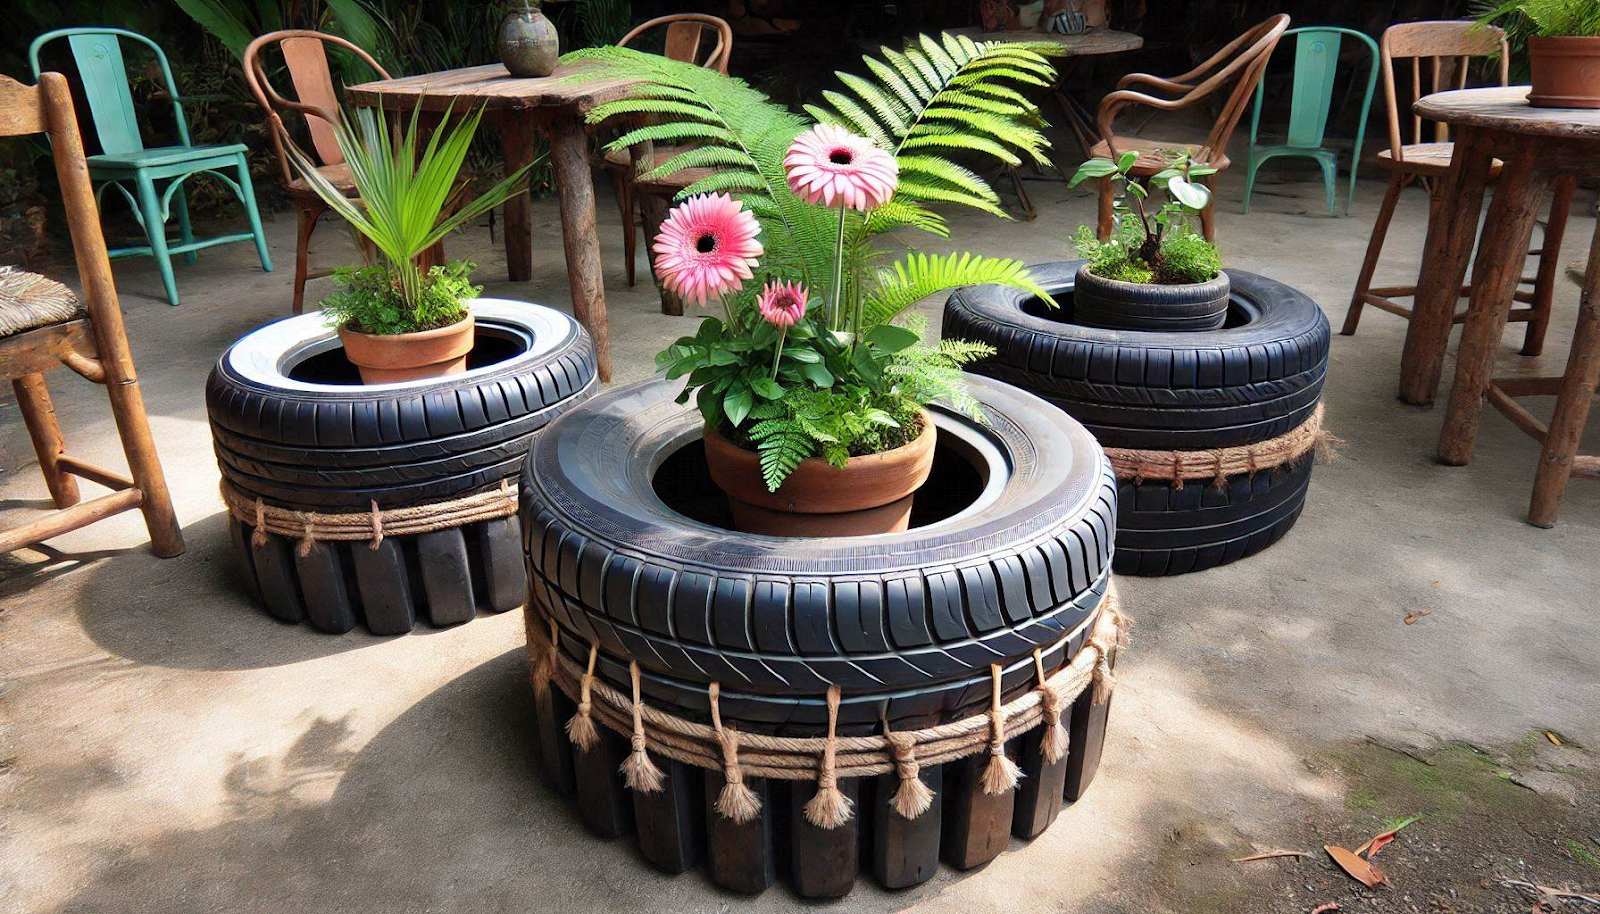
Old tires can be transformed into stylish, functional furniture pieces that add a bold and eco-friendly touch to your home decor. Whether used as ottomans or tables, this upcycling project is a creative way to give new life to something that would otherwise be discarded.
Steps to Create a Tire Ottoman:
- Clean the Tire: Begin by cleaning the tire thoroughly to remove dirt, grease, and debris. Use soap and water to wash the surface and make sure the tire is free from grime before proceeding with the next steps.
- Wrap with Material: For a sleek and modern look, wrap the tire with jute rope, fabric, or leather. You can choose a material that fits your decor style—natural jute for a rustic vibe, fabric for a soft touch, or leather for a more upscale, contemporary feel. Make sure to wrap the material tightly and secure it with strong adhesive or staples.
- Add a Top: Attach a cushioned or flat surface to the top of the tire to create a comfortable seating area. Use plywood or a wooden board for a solid surface, or add foam padding and upholstery for extra comfort. You can also cover the top with fabric that matches or contrasts with the wrapping material for a coordinated look.
Creative Uses:
- As an Ottoman: The tire ottoman makes a great addition to living rooms or bedrooms, offering both a comfortable seat and a conversation starter. It’s perfect for kicking up your feet after a long day or using as extra seating when guests arrive.
- As a Coffee Table: By adding a flat surface on top of the tire, you can create a unique, industrial-style coffee table. Pair it with a glass top or wooden board for a functional and eye-catching centerpiece in your living room.
- Outdoor Furniture: Tires are durable, making them perfect for outdoor spaces. Use them to create outdoor ottomans, side tables, or garden stools for a fun, eco-conscious touch to your patio or garden area.
Styling Tips:
- Paint the Tire: For a more vibrant and personalized look, paint the tire in bold colors or patterns. Consider using spray paint for a smooth finish or stenciling a design to match your room’s aesthetic.
- Add Decorative Elements: Adorn your tire furniture with accessories like throw pillows, blankets, or decorative trays to complement the overall design and add comfort or functionality.
Upcycling tires into ottomans or tables not only saves the environment but also results in unique, functional furniture that brings a distinctive flair to your home. Whether used indoors or outdoors, this project is an excellent way to make an eco-friendly statement.
Benefits of Upcycling for Furniture and Home Decor
Upcycling furniture and home decor offers a wide range of benefits, making it an appealing choice for anyone looking to enhance their living space while being mindful of both the environment and their budget. Here are some key advantages:
1. Environmental Impact: Reduces Waste and Promotes Sustainability
Upcycling helps to minimize the amount of furniture and decor that end up in landfills. By repurposing old or discarded items, you’re reducing waste and conserving natural resources. This sustainable approach also lowers the carbon footprint associated with manufacturing new furniture, contributing to a healthier planet.
2. Financial Savings: Cost-Effective Compared to Buying New Furniture
Upcycling is a highly cost-effective way to furnish your home. Old furniture or materials are often available for free or at a low cost, and with a little creativity and effort, you can transform them into beautiful, functional pieces. This makes it a budget-friendly alternative to purchasing brand-new, often expensive, furniture.
3. Unique Designs: Each Piece Tells a Story and Adds Character
Upcycled furniture and decor have a distinct charm that mass-produced pieces can’t replicate. Every upcycled item carries its own history and personality, adding a one-of-a-kind element to your home. Whether it’s a vintage dresser turned into a bathroom vanity or a reclaimed wood wine rack, each upcycled piece brings a personal touch that reflects your creativity and style.
4. Preservation of Craftsmanship and Tradition
Upcycling encourages the appreciation of old craftsmanship and materials, often resulting in furniture pieces that are more durable and unique than mass-produced alternatives. By breathing new life into these items, you’re preserving quality materials and traditional techniques that might otherwise be forgotten.
5. Creative Expression and Personalization
Upcycling allows you to express your creativity and create pieces that match your vision and aesthetic preferences. With endless possibilities for customization—whether through painting, reupholstering, or mixing materials—you can design furniture and decor that’s truly tailored to your space.
Tips to Start Upcycling Projects
Upcycling can be a fun and rewarding way to breathe new life into old items, but it can also seem overwhelming if you’re new to it. Here are some practical tips to help you get started and ensure your projects turn out beautifully:
1. Begin with Small, Manageable Projects
If you’re new to upcycling, start with simple projects to build your confidence and skill. Small items like picture frames, plant pots, or a basic wooden chair are excellent starting points. Once you’re comfortable with basic techniques, you can progress to more complex pieces like furniture or home decor items.
2. Use Quality Tools for Better Results
Invest in quality tools for upcycling projects, as they can make a big difference in the final outcome. Essential tools might include a power drill, saw, sander, staple gun, and paintbrushes. Quality tools not only make the process smoother but also help achieve more professional results, ensuring your upcycled items are both durable and visually appealing.
3. Experiment with Different Styles and Techniques
Don’t be afraid to experiment! Upcycling offers endless possibilities, and trying out various styles and techniques will help you discover your personal preferences. Explore different painting techniques, fabric upholstering methods, or decorative finishes to see what works best for each project. You might be surprised at the creative combinations you can come up with.
4. Gather Inspiration and Learn from Others
Look for inspiration in upcycling blogs, Pinterest, or Instagram. Watching tutorials or following step-by-step guides can provide helpful insights and boost your creativity. Seeing what others have done with similar materials can spark ideas and give you the confidence to try something new.
5. Plan and Visualize Before You Start
Take time to plan your project before diving in. Visualize what the finished piece will look like and gather all the necessary materials. Sketching out the design can help you stay organized and ensure that you’re working toward a specific goal.
6. Embrace Imperfections
One of the joys of upcycling is that it allows you to embrace imperfections. Not every piece needs to look brand new or flawless. The charm of upcycled items often comes from their unique history and character. So, don’t be discouraged by small flaws—they only add to the story of the piece.
7. Be Patient and Take Your Time
Upcycling can be a detailed and time-consuming process, so patience is key. Rushing through a project can lead to mistakes or a less-than-ideal result. Take your time to ensure each step is completed properly, from sanding and painting to assembling and finishing.
Common Challenges in Upcycling and How to Overcome Them
While upcycling is a rewarding and sustainable way to refresh your home decor, there are some common challenges you might face along the way. Here are a few of these challenges and tips for overcoming them:
1. Structural Integrity: Reinforce Old Materials for Safety
When working with old furniture or materials, it’s important to ensure that the item remains safe and functional. Over time, wood can become weak, and metal can rust, making some pieces unsafe to use without proper reinforcement.
How to Overcome It:
- Inspect the Condition: Before starting any project, carefully inspect the structural integrity of the piece. Look for signs of damage, rot, or rust.
- Reinforce Weak Areas: Strengthen old materials with wood glue, screws, or brackets where necessary. For wood items, consider adding additional support beams or replacing broken sections. If you’re working with metal, sand away rust and treat it with rust-resistant paint.
- Consult Tutorials: If you’re unsure about how to reinforce a specific material or piece, look up tutorials or ask an experienced upcycler for guidance to ensure the finished product is safe and durable.
2. Material Sourcing: Finding the Right Materials
Finding the right materials for upcycling projects can be a bit of a challenge, especially when it comes to sourcing high-quality or specific items. Thrift stores, flea markets, and online marketplaces are great places to look, but finding the right pieces may take time and patience.
How to Overcome It:
- Scout Thrift Stores and Flea Markets: These places are goldmines for materials and old furniture. Look for items with good bones, such as sturdy wooden chairs, old doors, or crates. Even if the item looks a bit worn, it can still be upcycled with a little effort.
- Online Marketplaces: Platforms like Craigslist, Facebook Marketplace, and eBay offer great deals on used furniture or materials. You can often find items for free or at very low prices, especially if you’re patient and keep an eye out for new listings.
- Repurpose Everyday Items: Don’t limit yourself to furniture. Old picture frames, used pallets, wooden crates, or even discarded household objects can be creatively transformed into new pieces.
- Build Relationships with Sellers: If you find a source you like, build relationships with sellers. Often, they’ll notify you when new items come in, giving you first dibs on materials.
3. Time and Effort Commitment: Upcycling Takes Patience
Upcycling is a time-consuming process, and it can be frustrating when projects take longer than expected or require more effort than anticipated.
How to Overcome It:
- Break the Project into Steps: Instead of trying to complete the entire project in one go, break it down into smaller, manageable tasks. Focus on one step at a time—whether it’s sanding, painting, or assembling—so you don’t feel overwhelmed.
- Set Realistic Timelines: Give yourself plenty of time for each phase of the project. Upcycling can take longer than working with new materials, so it’s important to be realistic about your time commitments.
- Take Breaks: If you feel frustrated or tired, take a break. Sometimes stepping away for a bit can give you a fresh perspective and make the work feel less overwhelming.
4. Limited Tools and Skills: Lack of Professional Equipment
Some upcycling projects require tools and skills that you might not have at first. This can be intimidating if you don’t have a fully stocked workshop.
How to Overcome It:
- Start Simple: Begin with projects that require minimal tools, like painting, sanding, or adding decorative elements. As your skills improve, gradually invest in more tools or try more complex projects.
- DIY or Borrow Tools: If you’re missing a tool, see if you can borrow it from a friend or rent it from a hardware store. Many rental shops offer tools for a fraction of the cost.
- Take a Workshop or Online Course: If you’re interested in learning new skills, consider taking a workshop or an online course. Many free tutorials and videos are available to help you improve your upcycling techniques.
5. Design Limitations: Making the Pieces Fit into Your Home’s Aesthetic
Upcycling often involves working with materials that are mismatched or have a distinct vintage look. It can be challenging to make these items blend seamlessly into your existing decor.
How to Overcome It:
- Customize the Design: You can personalize upcycled items by painting, staining, or reupholstering them to match your style. Don’t be afraid to get creative with finishes and patterns.
- Consider Functionality and Aesthetic: Even if a piece doesn’t perfectly match the rest of your decor, try to make it work by pairing it with complementary items. For example, a rustic wooden dresser can stand out beautifully in a modern home if styled with the right accessories or paired with other natural materials.
FAQs About Upcycling Ideas for Furniture and Home Decor
Is upcycling expensive?
No, upcycling is often much cheaper than buying new furniture or decor. You can source materials from thrift stores, flea markets, or even your own home, making it a budget-friendly alternative. In many cases, the only costs involved are for tools, paints, or finishes.
Do I need special tools for upcycling?
Basic tools such as a power drill, saw, sandpaper, and paintbrushes are usually sufficient for most upcycling projects. As you progress, you may find you want to invest in specialized tools, but many successful upcycling projects can be completed with what you already have at home.
Can anyone upcycle furniture?
Yes! Upcycling is accessible to everyone, including beginners. With the right resources, a bit of creativity, and some guidance, even newcomers can create amazing and functional furniture pieces. Start with simple projects and gradually build your skills.
How do I maintain upcycled furniture?
Maintaining upcycled furniture is fairly easy. Regular cleaning with appropriate cleaners will keep the pieces looking fresh. For wood furniture, occasional polishing or touch-ups (like sanding and repainting) can help maintain its appearance. For upholstered items, regular vacuuming or fabric care can keep them in top shape.
Where can I find materials for upcycling?
Materials for upcycling can be found in a variety of places. Thrift stores, flea markets, garage sales, and even online platforms like Facebook Marketplace, Craigslist, and eBay are great places to source inexpensive or free items. You can also repurpose old furniture, crates, or even discarded objects from around your home.
Conclusion: Your Home, Your Creativity
Upcycling furniture allows you to create unique and personalized pieces that reflect your style. By following these ideas, you can transform your living space into a haven of creativity and sustainability. So, grab your tools and start your upcycling journey today!